WP7 Tutorial : 01 - Introduction
Jump started with my first exploration to create a "Hello World" application in Windows Phone 7.1 (Mango) public Beta.
This is the first post of the series. As a beginner I will be contributing to the series and if something that I can improve in any of the posts/demos, please let me know by providing your inputs using the Comment box. Hope this series will help the beginners to learn about it.
Prerequisite
If you are new to Windows Phone 7, you need to install the Developer Tools. Currently Windows Phone 7.1 (Mango) is in it's public beta release. You can download it from any of the following path:
- Web Installer for Windows Phone 7.1 Beta Tools - 3.4 MB
- Standalone/Offline installer for Windows Phone 7.1 Beta Tools (ISO image) - 717.81 MB
- Developer Tools Beta Release Note - 48 KB
Once downloaded, start the installation process to continue. Remember that, if you have Visual Studio 2010 already installed in your development environment, you must install Service Pack 1 before installing the Windows Phone 7.1 Developer Tools.
You can find more information about the installer and System Requirements here: Download Windows Phone Developer Tools 7.1 Beta
Create Project
Once we are done with setting up the development environment, we are ready to create our first project. Open Visual Studio 2010 and create New project. In the "New Project" dialog Window:
- Select "Silverlight for Windows Phone" from the left panel. The respective templates will filter out in the right panel.
- As we are creating a new Application project, select "Windows Phone Application" from the right panel.
- Enter a name and path for the project.
- Click "OK" to continue.
Have a look into the below screenshot for reference:
A second dialog will popup asking you to chose the target version for our application. We will chose "Windows Phone 7.1", which is the latest version. Click "OK" to continue creating the first project.
This will create the project for you. In the Solution Explorer, you will notice that, the project has one App.xaml and it's associated CS file, a MainPage.xaml and it's associated CS file, three JPG images named as "ApplicationIcon", "Background" and "SplashScreenImage". No need to explain more on this as the names are self explanatory.
Analysis of Code
Lets start doing the analysis with the existing XAML code that is present in the MainPage.xaml file. On creation of the project, the IDE template will create the default XAML inside MainPage.xaml file.
Here is the complete code of that:
<phone:PhoneApplicationPage
x:Class="HelloWorld.MainPage"
xmlns="http://schemas.microsoft.com/winfx/2006/xaml/presentation"
xmlns:x="http://schemas.microsoft.com/winfx/2006/xaml"
xmlns:phone="clr-namespace:Microsoft.Phone.Controls;assembly=Microsoft.Phone"
xmlns:shell="clr-namespace:Microsoft.Phone.Shell;assembly=Microsoft.Phone"
xmlns:d="http://schemas.microsoft.com/expression/blend/2008"
xmlns:mc="http://schemas.openxmlformats.org/markup-compatibility/2006"
mc:Ignorable="d" d:DesignWidth="480" d:DesignHeight="768"
FontFamily="{StaticResource PhoneFontFamilyNormal}"
FontSize="{StaticResource PhoneFontSizeNormal}"
Foreground="{StaticResource PhoneForegroundBrush}"
SupportedOrientations="Portrait" Orientation="Portrait"
shell:SystemTray.IsVisible="True">
<!--LayoutRoot is the root grid where all page content is placed-->
<Grid x:Name="LayoutRoot" Background="Transparent">
<Grid.RowDefinitions>
<RowDefinition Height="Auto"/>
<RowDefinition Height="*"/>
</Grid.RowDefinitions>
<!--TitlePanel contains the name of the application and page title-->
<StackPanel x:Name="TitlePanel" Grid.Row="0" Margin="12,17,0,28">
<TextBlock x:Name="ApplicationTitle" Text="MY APPLICATION"
Style="{StaticResource PhoneTextNormalStyle}"/>
<TextBlock x:Name="PageTitle" Text="page name" Margin="9,-7,0,0"
Style="{StaticResource PhoneTextTitle1Style}"/>
</StackPanel>
<!--ContentPanel - place additional content here-->
<Grid x:Name="ContentPanel" Grid.Row="1" Margin="12,0,12,0"></Grid>
</Grid>
<!--Sample code showing usage of ApplicationBar-->
<!--<phone:PhoneApplicationPage.ApplicationBar>
<shell:ApplicationBar IsVisible="True" IsMenuEnabled="True">
<shell:ApplicationBarIconButton IconUri="/Images/appbar_button1.png"
Text="Button 1"/>
<shell:ApplicationBarIconButton IconUri="/Images/appbar_button2.png"
Text="Button 2"/>
<shell:ApplicationBar.MenuItems>
<shell:ApplicationBarMenuItem Text="MenuItem 1"/>
<shell:ApplicationBarMenuItem Text="MenuItem 2"/>
</shell:ApplicationBar.MenuItems>
</shell:ApplicationBar>
</phone:PhoneApplicationPage.ApplicationBar>-->
</phone:PhoneApplicationPage>
If you check, it has a Grid with 2 rows. The first one is to set the title of the page and the second one is to set the content of the page.
If you proceed to the next code placed just below of it, you will see a StackPanel having two TextBlock inside it. The first TextBlock contains title of the Application and the second TextBlock contains title of the Page. Here is the code snippet of the same:
If you go little bit more, you will find another Grid placed in the second Row. This is nothing but the content area. You can place any content here. Here is the screenshot of the same code snippet:
If you go in depth more, you will find the below commented code:
What is that commented code? This is the part for Application Bar. You can place additional buttons specific to your application. You can also place menu items in this section to do some specific tasks. We will discuss on it in later posts.Playing with the Code
Now time to play with the code. Let us add the application title and page title there. Go to the Title Panel and modify the XAML code like this:
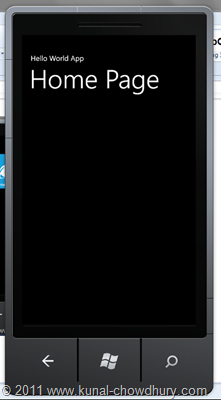
Let's run the application now. You will see that, it will open the Windows Phone Emulator on the screen. After the loading completes, it will show the application page in the UI. There you will notice that, it has the proper title for the Application and Page.
In our example, "Hello World App" is the Application title and "Home Page" is the page title. Have a look into the below screenshots for more details:
Lets add a TextBlock as the content of the page. To do this, go to the ContentPanel and add a TextBlock as shown below:
If you run the application now, you will see the below UI in the Windows Phone Emulator containing the content text:
Application List
If you want to see the hosted application in the Emulator, you can do that too. This step will show you how the application will look in the installed application list. Follow the below steps to see it in action:
In emulator, you will see a Back button as shown in the first screenshot. Click it and that will navigate you to the Home Screen. As shown in the second screenshot, click the small arrow marked with the circle above. You will navigate to the installed application list. There you will find our "Hello World" application listed there as shown above.
Download
- Hello World Source Code - 20 KB
Source : www.kunal-chowdhury.com/
Hope, this will help you to understand the basics of Windows Phone 7 Programming!
Share


