WP7 Tutorial : 04 - Know more about PhoneApplicationPage

Sep 13, 2012 Posted by Lara Kannan 0 comments

In our last post of the series, we learned about the base class "Page" and Here in this post we will learn about "PhoneApplicationPage" which is root of any Windows Phone 7 page.

Before jumping to the core in depth, a beginner must know all these things. As I am also exploring these for the first time, sharing the same knowledge with you.

I hope that, these series of posts will be helpful to a beginner. If you want to know more about PhoneApplicationPage class, read this post to learn about it.

What is PhoneApplicationPage?


PhoneApplicationPage is the root of any Windows Phone 7 XAML page. If you already worked on Silverlight, you must be aware of that by default "UserControl" is the root of any Silverlight XAML page. Similarly, Phone 7 XAML has the root named "PhoneApplicationPage".

As we described in our last post, every PhoneApplicationPage derives from "Page" which again derives from "UserControl". Hence, it is also nothing but a UserControl which has some additional features for Phone 7 application.

 
<phone:PhoneApplicationPage 
    x:Class="HelloWorldDemo.MainPage"
    xmlns="http://schemas.microsoft.com/winfx/2006/xaml/presentation"
    xmlns:x="http://schemas.microsoft.com/winfx/2006/xaml"
    xmlns:phone="clr-namespace:Microsoft.Phone.Controls;assembly=Microsoft.Phone"
    xmlns:shell="clr-namespace:Microsoft.Phone.Shell;assembly=Microsoft.Phone"
    SupportedOrientations="Portrait" Orientation="Portrait" shell:SystemTray.IsVisible="True">


PhoneApplicationPage derives from Page class and can be found in Microsoft.Phone.Controls namespace. It has three Dependency Properties called "SupportedOrientations", "Orientation" and "ApplicationBar".

Have a look into the class meta data here:

 
namespace Microsoft.Phone.Controls
{
    public class PhoneApplicationPage : Page
    {
        public static readonly DependencyProperty SupportedOrientationsProperty;
        public static readonly DependencyProperty OrientationProperty;
        public static readonly DependencyProperty ApplicationBarProperty;
        public PhoneApplicationPage();
        public SupportedPageOrientation SupportedOrientations { get; set; }
 
        public PageOrientation Orientation { get; [EditorBrowsable(EditorBrowsableState.Never)]
        set; }
 
        public IApplicationBar ApplicationBar { get; set; }
        public IDictionary<string, object> State { get; }
        ~PhoneApplicationPage();
        protected virtual void OnOrientationChanged(OrientationChangedEventArgs e);
        protected virtual void OnBackKeyPress(CancelEventArgs e);
        protected virtual void OnRemovedFromJournal(JournalEntryRemovedEventArgs e);
        public event EventHandler<OrientationChangedEventArgs> BeginLayoutChanged;
        public event EventHandler<OrientationChangedEventArgs> OrientationChanged;
        public event EventHandler<CancelEventArgs> BackKeyPress;
    }
}


Let's discuss about the three properties available in PhoneApplicationPage.

What is SupportedPageOrientation?


SupportedPageOrientations is a Dependency Property of enum type SupportedPageOrientation, present in the Microsoft.Phone.Controls namespace and contains three enum values called "Portrait", "Landscape" and "PortraitOrLandscape".

It defines the property value to define the orientation supported by the application. If you define Portrait orientation your application will support only Portrait view, if declared as Landscape your application will support both left and right landscape view. The third property value defines that your application will support both Portrait and Landscape views.

 
namespace Microsoft.Phone.Controls
{
    public enum SupportedPageOrientation
    {
        Portrait = 1,
        Landscape = 2,
        PortraitOrLandscape = 3,
    }
}

What is PageOrientation?


PageOrientation is also a dependency property present in the Microsoft.Phone.Controls namespace. It defines the possible orientation of a Windows Phone 7 page.

 
namespace Microsoft.Phone.Controls
{
    public enum PageOrientation
    {
        None = 0,
        Portrait = 1,
        Landscape = 2,
        PortraitUp = 5,
        PortraitDown = 9,
        LandscapeLeft = 18,
        LandscapeRight = 34,
    }
}

From the meta data of the PageOrientation enum, you can easily understand about the property values. Use Portrait or Landscape property value to check the orientation of your application. According to the MSDN Documentation, if you want to check LandscapeLeft or LandscapeRight for Landscape orientation, check both of them and never check only left or right.

What is ApplicationBar?


This is a dependency property of type IApplicationBar which derives by the ApplicationBar class. It allows developers to create and display an application bar with 1-4 buttons and a set of text menu items for your Windows Phone application. IApplicationBar interface is part of Microsoft.Phone.Shell namespace and defines few properties as mentioned below:

 
namespace Microsoft.Phone.Shell
{
    public interface IApplicationBar
    {
        bool IsVisible { get; set; }
        double Opacity { get; set; }
        bool IsMenuEnabled { get; set; }
        Color BackgroundColor { get; set; }
        Color ForegroundColor { get; set; }
        IList Buttons { get; }
        IList MenuItems { get; }
        event EventHandler<ApplicationBarStateChangedEventArgs> StateChanged;
    }
}

Hope, this information helped you to learn about the PhoneApplicationPage. We will see the implementation of it in our next post. Till then enjoy coding.


Source : www.kunal-chowdhury.com/

Hope, this will help you to understand the basics of Windows Phone 7 Programming!

Share
WP7 Tutorial : 03 - Isolated Storage

Posted by Lara Kannan 0 comments

Introduction


Isolated Storage aims to enable managed applications to create and maintain local storage. In Windows Phone 7 Silverlight-based applications, all I/O operations are restricted to isolated storage and do not have direct access to the underlying OS file system. Windows Phone application developers owe the ability to store data locally on the phone, leveraging all the benefits of isolated storage, such as providing security and preventing unauthorized access and data corruption from other applications.

In Windows Phone 7 programming Isolated Storage manipulation is as important as memory handling in traditional desktop applications. So, in this article we are still going to focus Isolated Storage.

Introducing Isolated Storage


To store local data a on a Windows Phone 7 phone, the tool of choice is isolated storage.  There are several efforts to create Windows Phone 7 databases, but in the end, these all run on top of isolated storage.

Isolated Storage is not new to Windows Phone, but  has been around a while in the Silverlight world.  And while it might sound fancy, isolated storage is just a clever way of saying “Write your data to text files.” 

We say Files and Folders are the building blocks for any application. We need to store data in our Phones to persist data when the application is not running. In case of Windows Phone 7 microsoft provides a secure way to store data into Isolated Store.

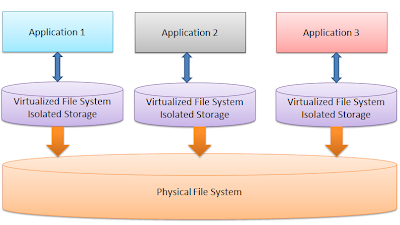
Isolated Storage, as the name suggests is a special virtualized file system that every application can access for standard IO operations yet the file is unavailable to any other application. Hence the files stored by one application is isolated from another.

Each application has a root of the store of this Virtualized File system. You can use the store to create folders and files. The main advantage of the Isolated store is independence between the actual file system and the application. Hence it gives a strong decoupling between the actual physical architecture of the system and the application. To understand, lets see the image below :

For Silverlight applications in Windows Phone 7, data may exist in several forms. For example, read-only data can be stored in a local file within your application.

User-specific data can be stored locally in an area called Isolated Storage. Data can also be stored on the Internet, which can be accessed through Web services.


Figure 1: Data Source in WP7 Silverlight App

The aim of designing Isolated Storage is to make each Windows Phone applications handle its own independent memory area, not to be affected by other Applications. In this way, applications can only focus upon the development of their own data.

If you need to store and retrieve user-specific information, you might consider using isolated storage.

There are typically two ways to use isolated storage. The first way is to save or retrieve data as key/value pairs by using the IsolatedStorageSettings class. The second way is to save or retrieve files by using the IsolatedStorageFile class.

Figure 2: Two ways to use isolated storage in WP7 Silverlight App


Basically in Silverlight for Windows Phone 7 you can store data in:

  • IsolatedStorageSettings

  • Folders and files in the Isolated Storage

  • Database

6 Things you need to consider when using Isolated Storage


  • 1. "Isolated"  storage means that your application can not share any data with another application. If you need two applications to use the same data, then that data can't be local to either of them.  Instead, you can use a web service and store the data on the web. Once your data is stored in the cloud, it can be accessed by as many applications you want.

  • 2. When an application is updated in Windows Phone Marketplace, its isolated storage folder is not modified. So if you change the data in Isolated Storage when upgrading your app to a new version, it is up to you to upgrade and modify your files so that the new version is working properly.

  • 3. IsolatedStorageSettings is not thread-safe and can throw IsolatedStorageException if used simultaneously from multiple threads.

  • 4. When a WP7 application is uninstalled, its isolated storage data will be deleted.

  • 5. Stored resources on a phone are limited.

  • 6. When a Windows Phone has only 10 percent of its storage space remaining, the user receives a status notification.

Best Practices


  • If using Directories always check if the Directory exists otherwise an exception could happen.

  • A directory must be empty before it is deleted. The deleted directory cannot be recovered once deleted.

  • It is a common practice to use  try{}catch{} when working with the Isolated Storage to prevent any unexpected exception to be seen by the user.

  • When working with files always use Using statement because it provides a convenient syntax that ensures the correct use of IDisposable objects.

  • When working with files always check if the Directory in which you want to create/delete a File exists.

  • Check for existing file before trying to read it

  • All Key/Value pairs in the IsolatedStorageSettings must be unique pairs, so before saving any value to the settings make sure that  it has a unique key.

  • Make sure that you have cleared all temporary data in Isolated Storage in case this data will no longer be used(usually upon application exit). A good practice is to create a temporary cache folder  that you can clear.

  • Make sure that users are enabled to delete any new data they have created. For example if users can generate files using your app they have to be able to delete these files as well.

  • Do not save important values like passwords as a plain text. Always try to encrypt them.


Source : http://www.windowsphonegeek.com & www.kunal-chowdhury.com

Hope, this will help you to understand the basics of Windows Phone 7 Programming!

Share

WP7 Tutorial : 02 - Know more about Page

Sep 12, 2012 Posted by Lara Kannan 0 comments
It's time to explore more in depth about the page. In this post, we will discuss about the base class called "Page".

Introduction to Page


Like "MainPage.xaml", every Windows Phone 7 page inherits from "PhoneApplicationPage" by default, which is part of Microsoft.Phone.Controls namspace.

PhoneApplicationPage itself derives from the base class called "Page", part of System.Windows.Controls namspace.

Every "Page" is nothing but a derived class of UserControl and if you are already familiar with the UserControl hierarchy, you know that the most topper class is the DependencyObject.

To make it simpler for you to understand, here is the complete hierarchy of a Windows Phone 7 Page:
 
namespace System.Windows.Controls
{
    public class Page : UserControl
    {
        public NavigationContext NavigationContext { get; }
        public NavigationService NavigationService { get; }
        public string Title { get; set; }
        public NavigationCacheMode NavigationCacheMode { get; internal set; }
        protected virtual void OnFragmentNavigation(FragmentNavigationEventArgs e);
        protected virtual void OnNavigatedTo(System.Windows.Navigation.NavigationEventArgs e);
        protected virtual void OnNavigatingFrom(System.Windows.Navigation.NavigatingCancelEventArgs e);
        protected virtual void OnNavigatedFrom(System.Windows.Navigation.NavigationEventArgs e);
    }
}

From the above meta data it is clear that, every Page consists of a Title. This is nothing but the Page Title that we discussed on yesterday's demo. You can change the Page title as per your requirement.

Every page consists of three more read only properties called "NavigationContext", "NavigationService" and "NavigationCacheMode". Let's start describing each one of them.

What is NavigationContext?


NavigationContext is a sealed class placed under System.Windows.Navigation namespace. It contains a Disctionary object to store the QueryString parameter. Like ASP.Net page, you can pass and retrieve query string parameters to and from any page.
 
namespace System.Windows.Navigation
{
    public sealed class NavigationContext
    {
        public IDictionary<string, string> QueryString { get; }
    }
}

It is very useful if you want to pass any value between multiple connecting pages.

What is NavigationService?


Like NavigationContext, it is also a sealed class present in the System.Windows.Navigation namespace. It has many other properties and methods to use page navigations comfortably. Here is the meta data of the NavigationService class:
 
namespace System.Windows.Navigation
{
    public sealed class NavigationService
    {
        public Uri Source { get; set; }
        public Uri CurrentSource { get; internal set; }
        public bool CanGoForward { get; }
        public bool CanGoBack { get; }
        public IEnumerable<JournalEntry> BackStack { get; }
        ~NavigationService();
        public bool Navigate(Uri source);
        public void GoForward();
        public void GoBack();
        public void StopLoading();
        public JournalEntry RemoveBackEntry();
        public event NavigationFailedEventHandler NavigationFailed;
        public event System.Windows.Navigation.NavigatingCancelEventHandler Navigating;
        public event System.Windows.Navigation.NavigatedEventHandler Navigated;
        public event NavigationStoppedEventHandler NavigationStopped;
        public event FragmentNavigationEventHandler FragmentNavigation;
        public event EventHandler<JournalEntryRemovedEventArgs> JournalEntryRemoved;
    }
}
From the above code snippet, it is very easy to understand about the functionality of the class. Using the properties called "Source" and "CurrentSource" you can easily discover the source of the current page.

CanGoForward() and CanGoBack() returns boolean value, which tells you whether any page available in history to navigate forward and backward respectively.

Navigate() method navigates the current page to a different page supplied as parameter to the method. GoForward() and GoBack() instructs the OS to navigate to the next or previous page from the History. While loading your page, you can cancel the operation by calling the StopLoading() method from the navigation service.

What is NavigationCacheMode?


NavigationCacheMode is a enum property which describes whether to cache the page. The default value of it is Disabled. This is also part of System.Windows.Navigation namspace and contains three enum values as shown below:
 
namespace System.Windows.Navigation
{
    public enum NavigationCacheMode
    {
        Disabled,
        Required,
        Enabled,
    }
}

Set the NavigationCacheMode property to Disabled if a new instance must be created for each visit. Set NavigationCacheMode to Required if you want the page to cached regardless of the number of cached pages and set it to Enabled if you want the page to cached for a number of period until the number of cached pages exceeds the value of CacheSize.

Source : www.kunal-chowdhury.com/

Hope, this will help you to understand the basics of Windows Phone 7 Programming!

Share

WP7 Tutorial : 01 - Introduction

Posted by Lara Kannan 0 comments
I will write about Windows Phone 7 programming and whatever I will explore, will post here in my blog.

Jump started with my first exploration to create a "Hello World" application in Windows Phone 7.1 (Mango) public Beta.

This is the first post of the series. As a beginner I will be contributing to the series and if something that I can improve in any of the posts/demos, please let me know by providing your inputs using the Comment box. Hope this series will help the beginners to learn about it.

Prerequisite


If you are new to Windows Phone 7, you need to install the Developer Tools. Currently Windows Phone 7.1 (Mango) is in it's public beta release. You can download it from any of the following path:


Once downloaded, start the installation process to continue. Remember that, if you have Visual Studio 2010 already installed in your development environment, you must install Service Pack 1 before installing the Windows Phone 7.1 Developer Tools.

You can find more information about the installer and System Requirements here: Download Windows Phone Developer Tools 7.1 Beta

Create Project


Once we are done with setting up the development environment, we are ready to create our first project. Open Visual Studio 2010 and create New project. In the "New Project" dialog Window:

  1. Select "Silverlight for Windows Phone" from the left panel. The respective templates will filter out in the right panel.

  2. As we are creating a new Application project, select "Windows Phone Application" from the right panel.

  3. Enter a name and path for the project.

  4. Click "OK" to continue.

Have a look into the below screenshot for reference:

A second dialog will popup asking you to chose the target version for our application. We will chose "Windows Phone 7.1", which is the latest version. Click "OK" to continue creating the first project.


This will create the project for you. In the Solution Explorer, you will notice that, the project has one App.xaml and it's associated CS file, a MainPage.xaml and it's associated CS file, three JPG images named as "ApplicationIcon", "Background" and "SplashScreenImage". No need to explain more on this as the names are self explanatory.

Analysis of Code


Lets start doing the analysis with the existing XAML code that is present in the MainPage.xaml file. On creation of the project, the IDE template will create the default XAML inside MainPage.xaml file.

Here is the complete code of that:

 
<phone:PhoneApplicationPage 
    x:Class="HelloWorld.MainPage"
    xmlns="http://schemas.microsoft.com/winfx/2006/xaml/presentation"
    xmlns:x="http://schemas.microsoft.com/winfx/2006/xaml"
    xmlns:phone="clr-namespace:Microsoft.Phone.Controls;assembly=Microsoft.Phone"
    xmlns:shell="clr-namespace:Microsoft.Phone.Shell;assembly=Microsoft.Phone"
    xmlns:d="http://schemas.microsoft.com/expression/blend/2008"
    xmlns:mc="http://schemas.openxmlformats.org/markup-compatibility/2006"
    mc:Ignorable="d" d:DesignWidth="480" d:DesignHeight="768"
    FontFamily="{StaticResource PhoneFontFamilyNormal}"
    FontSize="{StaticResource PhoneFontSizeNormal}"
    Foreground="{StaticResource PhoneForegroundBrush}"
    SupportedOrientations="Portrait" Orientation="Portrait"
    shell:SystemTray.IsVisible="True">
 
    <!--LayoutRoot is the root grid where all page content is placed-->
    <Grid x:Name="LayoutRoot" Background="Transparent">
        <Grid.RowDefinitions>
            <RowDefinition Height="Auto"/>
            <RowDefinition Height="*"/>
        </Grid.RowDefinitions>
 
        <!--TitlePanel contains the name of the application and page title-->
        <StackPanel x:Name="TitlePanel" Grid.Row="0" Margin="12,17,0,28">
            <TextBlock x:Name="ApplicationTitle" Text="MY APPLICATION" 
                       Style="{StaticResource PhoneTextNormalStyle}"/>
            <TextBlock x:Name="PageTitle" Text="page name" Margin="9,-7,0,0" 
                       Style="{StaticResource PhoneTextTitle1Style}"/>
        </StackPanel>
 
        <!--ContentPanel - place additional content here-->
        <Grid x:Name="ContentPanel" Grid.Row="1" Margin="12,0,12,0"></Grid>
    </Grid>
 
    <!--Sample code showing usage of ApplicationBar-->
    <!--<phone:PhoneApplicationPage.ApplicationBar>
        <shell:ApplicationBar IsVisible="True" IsMenuEnabled="True">
            <shell:ApplicationBarIconButton IconUri="/Images/appbar_button1.png" 
                                            Text="Button 1"/>
            <shell:ApplicationBarIconButton IconUri="/Images/appbar_button2.png"
                                            Text="Button 2"/>
            <shell:ApplicationBar.MenuItems>
                <shell:ApplicationBarMenuItem Text="MenuItem 1"/>
                <shell:ApplicationBarMenuItem Text="MenuItem 2"/>
            </shell:ApplicationBar.MenuItems>
        </shell:ApplicationBar>
    </phone:PhoneApplicationPage.ApplicationBar>-->
 
</phone:PhoneApplicationPage>

If you check, it has a Grid with 2 rows. The first one is to set the title of the page and the second one is to set the content of the page.

If you proceed to the next code placed just below of it, you will see a StackPanel having two TextBlock inside it. The first TextBlock contains title of the Application and the second TextBlock contains title of the Page. Here is the code snippet of the same:

If you go little bit more, you will find another Grid placed in the second Row. This is nothing but the content area. You can place any content here. Here is the screenshot of the same code snippet:

If you go in depth more, you will find the below commented code:

What is that commented code? This is the part for Application Bar. You can place additional buttons specific to your application. You can also place menu items in this section to do some specific tasks. We will discuss on it in later posts.

Playing with the Code


Now time to play with the code. Let us add the application title and page title there. Go to the Title Panel and modify the XAML code like this:

Let's run the application now. You will see that, it will open the Windows Phone Emulator on the screen. After the loading completes, it will show the application page in the UI. There you will notice that, it has the proper title for the Application and Page.

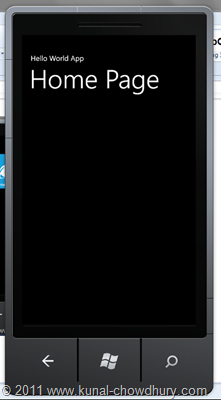
In our example, "Hello World App" is the Application title and "Home Page" is the page title. Have a look into the below screenshots for more details:


Lets add a TextBlock as the content of the page. To do this, go to the ContentPanel and add a TextBlock as shown below:

If you run the application now, you will see the below UI in the Windows Phone Emulator containing the content text:

Application List


If you want to see the hosted application in the Emulator, you can do that too. This step will show you how the application will look in the installed application list. Follow the below steps to see it in action:

In emulator, you will see a Back button as shown in the first screenshot. Click it and that will navigate you to the Home Screen. As shown in the second screenshot, click the small arrow marked with the circle above. You will navigate to the installed application list. There you will find our "Hello World" application listed there as shown above.

Download


Hope this article will help you to quick start your first application development in Windows Phone 7. Stay tuned for my next article on this topic.

Source : www.kunal-chowdhury.com/

Hope, this will help you to understand the basics of Windows Phone 7 Programming!

Share