Different ways to refresh or reload page using jQuery

Nov 28, 2011 Posted by Lara Kannan 0 comments
In this post, I will show you the different ways using which you can reload or refresh the webpage using jQuery. The first method is nothing to do with jQuery. It is a HTML tag which you need to put in the head section of your page and your page will get refreshed automatically after specified interval.

<meta http-equiv="refresh" content="10">

The meta tag with "http-equiv" is used to refresh the page. This attribute tells the browser that this meta tag is sending an HTTP command rather than a standard meta tag.

Refresh is an actual HTTP header used by the web server.The content attribute in the tag is having value in seconds. As per the above code, it is set to 10, which means after 10 seconds your page will get refreshed or reloaded.

You can also use jQuery to refresh/reload the page automatically. See below jQuery code.
function ReloadPage() { 
   location.reload();
};
 
$(document).ready(function() {
  setTimeout("ReloadPage()", 10000); .
});
location.reload() will reload the page again. The advantage of location.reload() is that it works with all the major browsers.

If you want to reload the page on click of button, then you can call location.reload() on button click event. See below jQuery code.
$(document).ready(function() {
     $('#btnReload').click(function() {
             location.reload();
       });
}); 

Hope this post will help you!

Share

Creating Your Own jQuery Custom Selector

Posted by Lara Kannan 1 comments
jQuery supports a large subset of selectors defined by the CSS3 Selectors draft standard. Additionally it also contains some very useful pseudo classes (similar to :first-child, :hover etc).

Due to its extensible framework, the best part is that jQuery lets you create and define your own custom selectors with ease. A full list of jQuery selectors is available on the jQuery site.

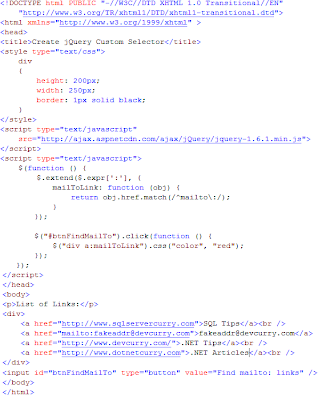
In this article, we will learn how to create our own custom selector that identifies all the mailto: links on a page. Let us see some code first:


As you can observe, we have extended jQuery’s selector expressions under the jQuery.expr[':'] object. To learn more about this, visit the jQuery hot Selector engine called sizzle. We have defined a custom selector called :mailToLink to which we are passing an object, which is a collection of links. This selector looks for all anchor elements that contains an href attribute matching mailto.

That’s it. Our selector :mailToLink is ready and here’s how we can use it:

To test this selector, we have used some hyperlinks, out of which one of them is a mailto: link. When you click the button, we use our custom selector to indentify the :mailto link and set it’s color to red.

As you can see, we have extended jQuery’s expression engine with ease!

The entire source code of this article can be downloaded over here. I hope you liked the article and I thank you for viewing it.

Source: www.dotnetcurry.com


Hope this post will help you!

Share

Web Browser Developer Tools vs Layout Engines

Posted by Lara Kannan 0 comments
A layout engine a.k.a web browser engine or browser rendering engine is a component that parses HTML, XML, CSS, Images etc. and renders it on the screen.

A browser developer tool lets you inspect, debug, analyze and diagnose issues with CSS, HTML, Scripts etc. inside your browser.

As a web developer, you must know what layout engines and developer tools your browser uses.

It helps to understand browser rendering and resolve issues when you are developing cross browser apps. Here’s a list of some popular browser developer tools and the layout engines for your reference.

Browseer Name Layout Engine Developer Tools
Chrome WebKit Google Chrome Inspector
FireFox Gecko Firebug
Internet Explorer and WP 7 Trident IE Developer Tools
Konqueror KHTML KIO
Opera (desktop and mobile) Presto Opera DragonFly
Safari (desktop and mobile) WebKit Web Inspector


Hope this information will help you updated!!!!

Share

Best way of using jQuery Selector

Posted by Lara Kannan 0 comments
It is pretty important to understand how to write efficient element selection statement. One has to be very careful while jQuery selector statement. Below are some tips on how to use your jQuery selectors efficiently.

1. Always try to use ID as selector

You can use ID as selector in jQuery. See below jQuery code.
$("#elmID");
When IDs are used as selector then jQuery internally makes a call to getElementById() method of Java script which directly maps to the element. When Classes are used as selector then jQuery has to do DOM traversal.So when DOM traversal is performed via jQuery takes more time to select elements. In terms of speed and performance, it is best practice to use IDs as selector.

2. Use class selector with tags

You can use CSS classes as selector. For example, to select elements with "myCSSClass" following jQuery code can be used.
$(".myCSSClass");
As said earlier, when classes are used DOM traversal happens. But there could be a situation where you need to use classes as selector. For better performance, you can use tag name with the class name. See below
$("div.myCSSClass");
Above jQuery code, restricts the search element specific to DIV elements only.

3. Keep your selector simple, don't make it complex

Avoid complex selectors. You should use make your selectors simple, unless required.
$("body .main p#myID em");
Instead of using such a complex selector, we can simplify it. See below.
$("p#myID em");

4.Don't use your selector repeatedly.

See below jQuery code. The selectors are used thrice for 3 different operation.
$("#myID").css("color", "red"); $("#myID").css("font", "Arial"); $("#myID").text("Error occurred!");
The problem with above code is, jQuery has to traverse 3 times as there are 3 different statements.But this can be combined into a single statement.
$("p").css({ "color": "red", "font": "Arial"}).text("Error occurred!");

5.Know how your selectors are executed

Do you know how the selectors are executed? Your last selectors is always executed first. For example, in below jQuery code, jQuery will first find all the elements with class ".myCssClass" and after that it will reject all the other elements which are not in "p#elmID".
$("p#elmID .myCssClass");

Hope this will help you. Happy coding!!!!

Share
Labels: ,

VisualStudio "Find in files" not working

Oct 15, 2011 Posted by Lara Kannan 0 comments
The "Find in files" function of Visual Studio (2008 or 2010) stops working. Whatever I search for it always says "No files were found to look in. Find was stopped in progress". It is very annoying. Since I have only found solution in blog.

The solution is to press Control + Scroll Lock and all is fixed. It works smart! :)

At present, the workaround is to press
  • Ctrl + Scroll Lock
  • Ctrl + Break
  • The Break key alone
  • ALT + Break
  • ALT + Scroll Lock

Thanks.

Share

VS Macro / Shortcuts to Expand / Collapse all regions

Oct 14, 2011 Posted by Lara Kannan 0 comments
CTRL+M CTRL+M (that's two key presses!) - Collapse / Open the current parent region

CTRL+M CTRL+L - Collapse / Open all regions in document recursively (meaning you might get only one line in the document - one big namespace region which is collapsed or you'll see the entire page code uncollapsed)

CTRL+M CTRL+O - Collapse all regions not recursively.

Share
Labels:

What a "GO" statement do in T-SQL ?

Sep 13, 2011 Posted by Lara Kannan 0 comments
What a "GO" statement do in T-SQL ?

By definition it is a batch separator. It will run a batch and commit it. But along with that it also accepts one parameter which tells the SQL engine basically how many times to do the job.

For Example:
SELECT * FROM   sys.objects;
GO 3
It will show the output THREE times :)

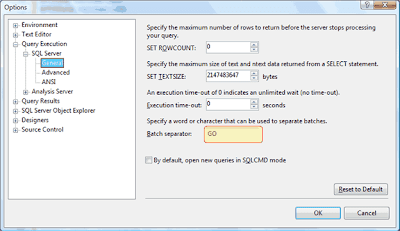
Note: "GO" is the keyword used by SSMS to separate query batches. It can be configured in this location:

Tools » Options » Query Execution » SQL Server » General. Change the value for "Batch Separator:" in the right pane.

To see the immediate effect of this change, you need to close all query windows in the current session and open new query window.


Next Example:

IF EXISTS (SELECT 1
FROM tempdb.sys.objects
WHERE name LIKE '%#ProductTable%')
DROP TABLE #ProductTable;

CREATE TABLE #ProductTable
(
ID INT IDENTITY (1, 1),
Name VARCHAR (50)
);
GO

INSERT INTO #ProductTable (Name) VALUES ('Office XP');
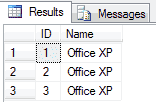
GO 3

SELECT * FROM #ProductTable;

OUTPUT:

Hope this helps you and thanks to SQLLion.

Share

Introduction to Script#

Posted by Lara Kannan 2 comments

Have you heard about Script#?

I knew that there is a Java-to-Javascript converter called GWT (Google Web Toolkit) in Java World since long time back and I thought that it might be good if we, the C# developers, also have that kinda tools for ASP.NET web development.

Now C# developers can do the same using Nikhil Kothari's Script# project. This is not quite the same as using Atlas with ASP.NET though both cover similar territory.

Nikhil has written a C# compiler that outputs JavaScript instead of IL code. JavaScript is a powerful but not very friendly scripting language and Ajax is a technology that updates part of web pages from a web server without redrawing the entire page.

Script# is a compiler that generate the Javascript instead of MSIL from C# sourcecode. Like GWT (Google Web Toolkit) that can convert the Java code to browser-compliant JavaScript and HTML, Script# is able to convert the C# codes to Javascript (either human-readable format or compact one). It is the best tool for those who hate to write the Javascript in HTML view.

How it works?

Script# works by compiling C# source code and files directly into a single JavaScript file, in much the same way as the C# compiler that generates MSIL into a single assembly.


The inputs into the C# compiler are your source files, and any referenced assemblies. The referenced assemblies represent either script APIs in existing script files written manually, or script APIs defined within another Script# project with a corresponding generated script file.

The regular C# compiler is used to produce an assembly for your code and the XML doc-comments file that can then be used to produce documentation. The Script# compiler on the other hand generates a .js script file. All the script files - existing and generated – can then be deployed into a Web site or Web application running on any platform for use at runtime without any Script# dependency.

During compilation, the C# compiler and Script# compiler together provide build-time type checking and validation of your code. This helps catch typos and other common script errors at build-time on the development machine as opposed to at runtime on the end-user's machine.

The Script# compiler produces both release and debug versions of your script. The release version is minimized by removing whitespace and by reducing identifier lengths for internal and private members with shorter names. The debug version is formatted for readability and debuggability

The Script# System

Logically speaking there are three layers to the Script# system:

  • The Compiler

  • The Core RunTime

  • The Framework


Script# Compiler - The compiler compiles C# code into JavaScript, and is only needed on the development or build machine. The compiler assumes the existence of APIs defined in the Script# core runtime to represent classes and other OOP constructs defined in the originating C# source code.

Script# Runtime - At development time, the runtime provides the equivalent of mscorlib.dll. It defines various key .NET types such as System.Object, primitive types and other core BCL types needed to author and compile C# source code.

At runtime, the core runtime is a small bootstrapper script file that implements how various OOP constructs are defined and simulated in JavaScript, as well as providing basic extensions to existing JavaScript objects to implement functionality expected by .NET developers.

The default Script# runtime is implemented in sscorlib.dll and its accompanying runtime counterpart sscorlib.js. To use Microsoft ASP.NET Ajax, the equivalent pair consists of aacorlib.dll and MicrosoftAjax.js as its runtime counterpart.

Runtime assemblies shipping with Script# representing other script APIs such as Virtual Earth, RSS Feeds etc. ship in assemblies named ss*.dll.

Script# Framework - The framework is completely optional. The choice of framework also depends on the application and the developer. The compiler itself is not bound or dependent in any way against any particular framework choice. The default ScriptFX framework accompanying Script# ships in assemblies and scripts named ssfx.*.dll and ssfx.*.js.

Using Script#

Script# can be used either via the command-line (ssc.exe) or via MSBuild (via a custom task added to your .csproj profile file). The MSBuild approach is recommended.

Sourcecode Download : SSharp.zip

For more reference click here

Share

Maintain Scroll Position After Postback in Asp.Net

Aug 29, 2011 Posted by Lara Kannan 2 comments

In this example i'm explaining different methods of maintaining scroll position after postback in asp.net 2.0, 3.5 & 4.0 web pages or applications.


Method : 1

Write below mention directive in page directive section of html source of aspx page to maintain scroll position of only one page or selected pages rather then whole web application.

<%@ Page Language="C#" AutoEventWireup="true" CodeFile="Default.aspx.cs" 

MaintainScrollPositionOnPostback="true" Inherits="_Default" %>


Method : 2

To maintain scroll position programmatically use code mentione below.

System.Web.UI.Page.MaintainScrollPositionOnPostBack = true;


Method : 3

To maintain scroll position application wide or for all pages of web application we can write below mentioned code in pages section of web.config file so that we don't need to add page directive in each and every page.

<pages maintainScrollPositionOnPostBack="true">


Hope this helps.

Share
Labels:

Design Patterns : An introduction

Jan 12, 2011 Posted by Lara Kannan 1 comments
Design Patterns

Design Patterns are an essential tool for any object orientated programmer who wants to take his/her skills to the next level. Understanding the specifics of Design Pattern practices and methodologies will help developers uncover reoccurring patterns in software development and give them the tools to apply the correct solution.

Types of Design Patterns

  • Informal Design Patterns - such as the use of standard code constructs, best practice, well structured code, common sense, the accepted approach, and evolution over time.

  • Formal Design Patterns - documented with sections such as "Context", "Problem", "Solution", and a UML diagram.

Formal patterns usually have specific aims and solve specific issues, whereas informal patterns tend to provide guidance that is more general. Formal patterns usually have specific aims and solve specific issues, whereas informal patterns tend to provide guidance that is more general.

For example, some patterns provide presentation logic for displaying specific views that make up the user interface. Others control the way that the application behaves as the user interacts with it. There are also groups of patterns that specify techniques for persisting data, define best practices for data access, and indicate optimum approaches for creating instances of objects that the application uses.

The following list shows some of the most common design patterns within these groups:

  • Presentation Logic

    1. Model-View-Controller (MVC)

    2. Model-View-Presenter (MVP)

    3. Use Case Controller

  • Host or Behavioral

    1. Command

    2. Publish-Subscribe / Observer

    3. Plug-in / Module / Intercepting Filter

  • Structural

    1. Service Agent / Proxy / Broker

    2. Provider / Adapter


  • Creational

    1. Factory / Builder / Injection

    2. Singleton


  • Persistence

    1. Repository


    1. test


Share
Labels: ,

Common Table Expressions (CTEs)

Jan 11, 2011 Posted by Lara Kannan 0 comments
Common Table Expressions (CTEs)

Why we need CTEs ?

You need to implement recursive queries to retrieve data which is presented in a hierarchical format. We normally resort to implementing views, cursors or derived tables and perform queries against them. The problem arises when the hierarchy level increases as SQL Server is limited to 32 levels of recursion.

We need a better way to implement recursive queries in SQL Server 2005 / 08. How do we do it? Use CTE.

Common Table Expressions (CTEs) are one of the most exciting features to be introduced with SQL Server 2005. CTEs come in 2 forms, non-recursive and recursive

A CTE is a "temporary result set" that exists only within the scope of a single SQL statement. It allows access to functionality within that single SQL statement that was previously only available through use of functions, temp tables, cursors, and so on.

CTE can be used for both selects and DML statements. CTEs can also contain references to themselves. CTEs can also be used in place of views.

You can also use a query hint to stop a statement after a defined number of loops. This can stop a CTE from going into an infinite loop on a poorly coded statement. You do this by including the MAXRECURSION keyword in the SELECT query referring to the CTE.

1. Non-Recursive CTE

Non-Recursive CTE as a derived table, or a temporary view.

The concept behind a CTE is simplicity itself. Consider the following statement:
with MyCTE(x)
as
(select x = 'Kannan')

select x from MyCTE

In brackets after the 'as' keyword is the query that defines the CTE and it simply returning the string "Kannan".


2. Recursive CTE

To print the numbers 5 to 10 using SQL. How ? Before we go to actual code, let we see the syntex of it.

Syntex
WITH cte_alias (column_aliases) 
AS
(
cte_query_definition --initialization
UNION ALL
cte_query_definition2 --recursive execution
)
SELECT * FROM cte_alias

The table defined in the CTE can be referenced in the CTE itself to give a recursive expression, using union all.
DECLARE @Start INT
DECLARE @End INT
SET @Start = 5;
SET @End = 10;

WITH CTE AS
(SELECT @Start AS NUM
UNION ALL
SELECT NUM + 1 FROM CTE WHERE NUM < @End
)

SELECT * FROM CTE

The query:
SELECT @Start AS NUM

is called the anchor member. This is executed in the first pass and will populate the CTE with the result, in this case 5. This initial CTE is repeatedly executed until the complete result set is returned. The next entry:
SELECT NUM + 1 FROM CTE WHERE NUM < @End

is a recursive member as it references the CTE, CTE. The recursive member is executed with the anchor member output to give 6. The next pass takes 6 as input and returns 7, and so on so that we arrive at a CTE populated with rows as follows:
5
6
7
8
9
10

The recursion will terminate when the recursive member produces no rows – in this case recursion stops when the length of x equals 10.


Note:
Note the ";" before the CTE definition – that's just a syntax requirement if the CTE declaration is not the first statement in a batch.

Disadvantage :

1. CTE will be available with the scope of the statement or block of code.
2. Compute, Order By (without a TOP), INTO, Option, FOR XML, and FOR BROWSE are all not allowed.

Hope this will help you. If so please add your comments. Thanks.

Share